In this section you will learn about the ID Scan transaction report. The report is available via the Repository when your customer has completed the journey.
The report is broken down into 5 sections. We will explore each section below.
Overview
The Overview tab contains a result and the identity document's basic information from a verification record. It includes DFA results, a verification trail, the individual’s location details, transaction statistics, and the number of captured attempts. Let us have a look at each feature in detail.
Transaction result
A breakdown of the results is shown on the right side of the record, along with its complete status under the STATUS field. The breakdown result gives the portal user some context on what part of the transaction passed or flagged.
If the breakdown check is green, that part has passed that particular check; if it is orange, that part has failed that specific check.
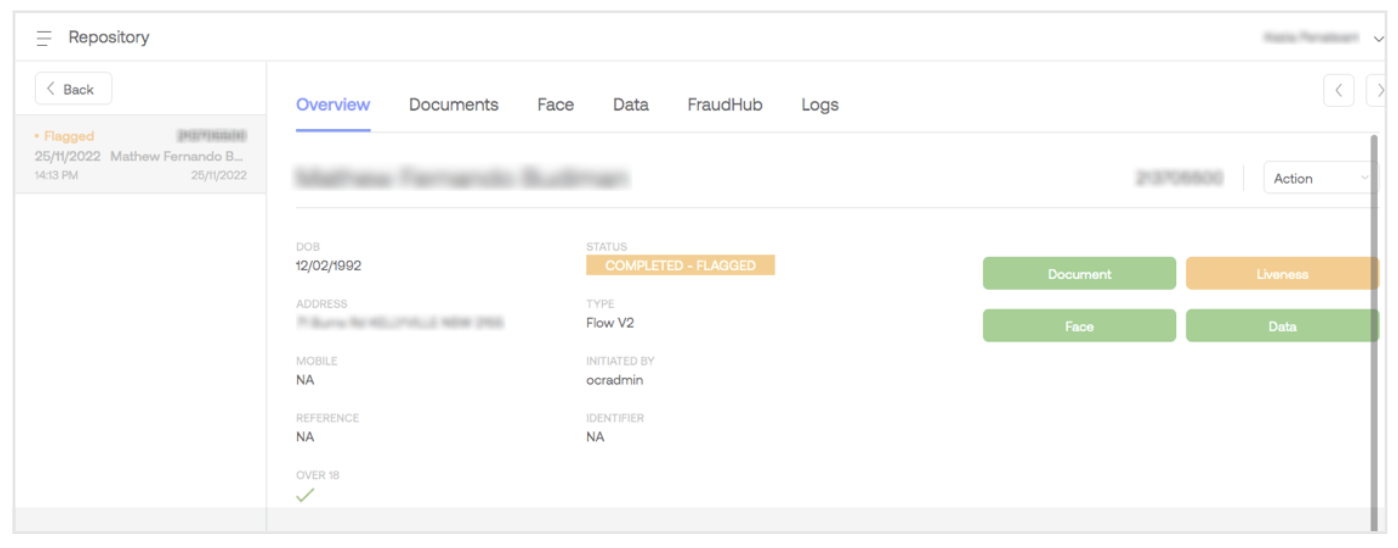
The transaction result contains the following checks:
| Checks | Description |
|---|---|
| Document | Check whether the document is genuine or tampered with and whether it can be trusted. |
| Liveness | Check to confirm that a live person is being presented in the application process. |
| Face | Check to verify that the live and present person is the same as shown on the trusted ID document. |
| Data | Check to verify details from third-party data sources, such as state registration bodies. |
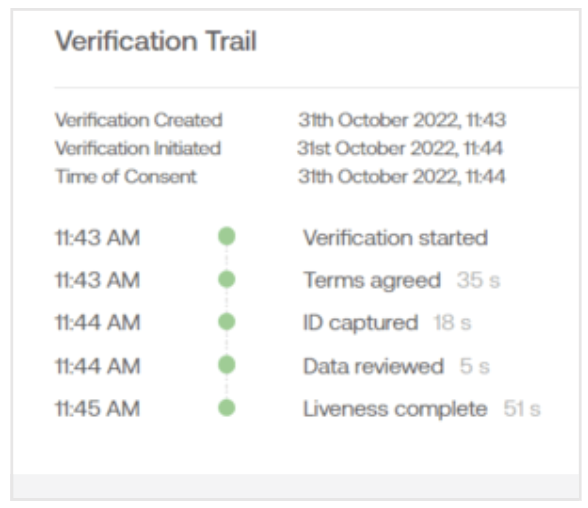
Verification Trail
The verification trail includes timing information, such as the date and time the record was initiated and completed, the date and time of consent, and so on. It also shows how long the individual spent on each step and when they arrived at a particular step.
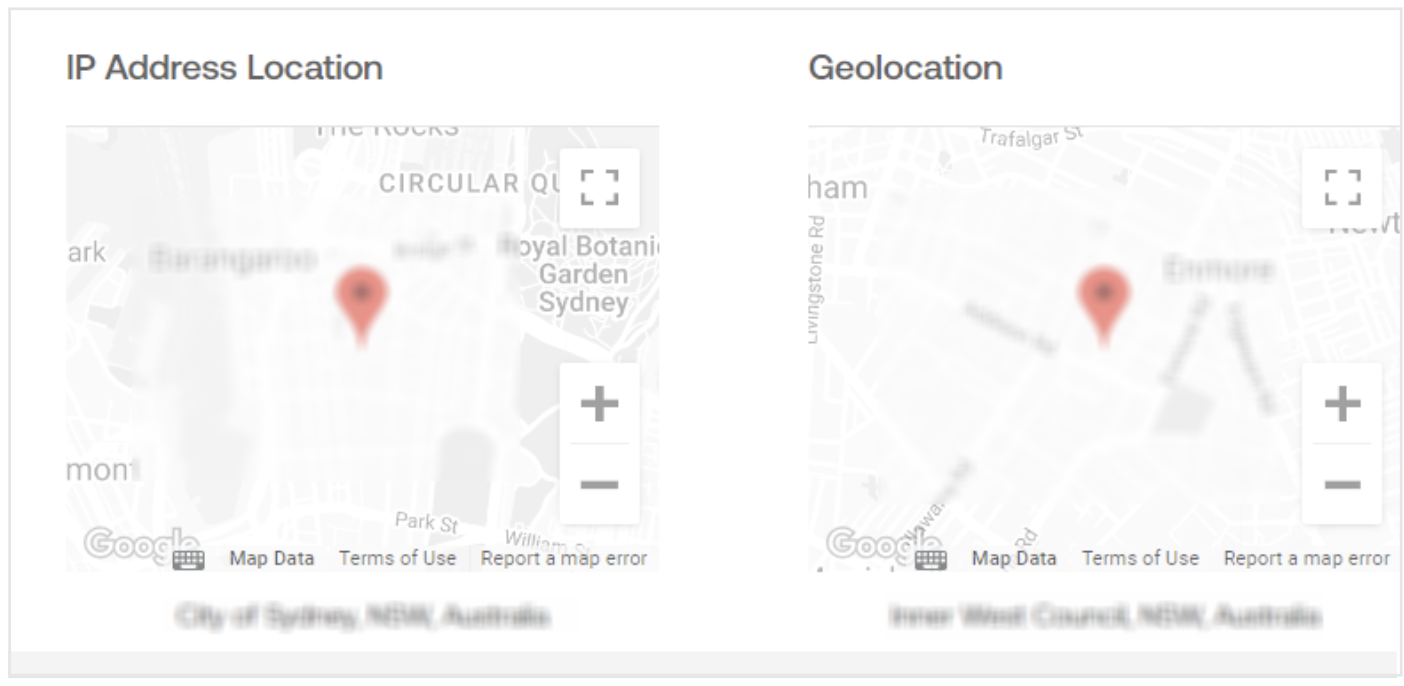
Location
The location section displays the IP Address Location and the individual's GPS or Geolocation on an interactive map. The map can be viewed in full-screen mode and zoomed in or out to assess the location.
The location result will not be retrieved if the individual has not given location permission.
Transaction Statistics
This section contains the statistics related to a transaction record. It is also possible to view the individual's ID capture and liveness attempts. It has the following fields:
| Checks | Description |
|---|---|
| Total Process Time | The total transaction processing time, excluding the time to review terms and conditions. |
| ID Captures | The total number of ID capture attempts. |
| Liveness Captures | The total number of liveness capture attempts. |
__
Device Data
This section contains the metadata of the individual's device. It has the following fields:
| Checks | Description |
|---|---|
| IP Address | The individual's IP address. |
| Device | The device used for verification. |
| Browser | The web browser the individual used to perform the verification. |
| Network | The network the device was connected to. |
| Network Country | The country of the detected network. |
| VPN Detected | VPN detection results. It will return YES if a VPN is detected. Otherwise, NO. |
Action Menu
Within the repository, an "Action" feature is available for both completed and incomplete transactions, with various action parameters such as Generate PDF, Override Flagged Transaction, Delete Record, and more. To access the drop-down list, click on the Action button in the top right of the screen.
Completed Transaction
The available actions are determined by the permission granted to the specific user. The following actions are available for a completed transaction record:
- Redact Data
- Generate PDF
- Delete Record
- Send Notification Again
- Override Flagged transaction
- Resubmit Data
Incomplete Transaction
The incomplete transaction record also includes an "Action" feature. The actions are determined by the permissions granted. The following actions are available for an incomplete transaction record:
- Redact Data
- Delete Record
- Send Notification Again
- Resubmit Data
Action Parameters
Info: Not all these action parameters might be available in your portal. It depends upon your permission level and role. The drop-down Action menu may contain the following parameters:
Generate PDF
The verification report in the form of a PDF document can be exported from the portal by clicking on the Generate PDF option.
Note: You are not able to generate a PDF report for an incomplete transaction (expired, pending, or in progress).
Delete Record
Users can delete a transaction from the portal by using the Delete Record action. Upon deletion, the record will not show up in the repository. This action cannot be undone.
To delete a record, click on Delete Record from the Action drop-down, and you will be prompted with a confirmation pop-up > click Delete to confirm the deletion.
Send Notification Again
If configured, the user can resend a completed email and webhook notification by using the Send Notification Again action feature. By clicking this, they can accomplish the following:
- Send notification emails based on the user profile and permissions of the user who created the ID verification. (For example, if an individual has a primary and secondary email address, both notifications will be sent again.)
- Send notification emails to the addresses specified for API-triggered ID verification.
- Send any Webhook notifications configured for that ID verification (this is also valid for API-triggered ID verifications).
To resend a completed notification, click on the Send Notification Again option from the Action drop-down list. > click Yes to proceed. The notification will be resent.
Override Flagged Transaction
The Override Flagged Transaction action parameter facilitates manual approval for flagged transactions before they are marked as completed. This action will override the previous results.
To override a flagged transaction, click on the Override Flagged Transaction action in the drop-down list > click Yes.
The transaction will be successfully updated.
You can see that the transaction that was previously marked as flagged has now been overridden and marked as passed. A record of which user chose to override the transaction and the date and time stamp is available on the 'Logs' tab.
Resubmit Data
The Resubmit Data action allows a failed data transaction to be resubmitted, possibly due to the third-party service being unavailable or incorrect data entry.
To resubmit data, follow the steps mentioned below:
If you notice that a third-party data check (such as Dataconnect, IDMatrix, Equifax NZ, Centrix, Data Zoo or GreenID) has failed, you can click Action and Resubmit Data (if you have been given the role permission to do so).
You can view the ID image, compare it to the fields sent in the data check, and make changes manually and click RESUBMIT DATA
Click Yes, Re-submit to confirm your changes.
The changes will be successfully resubmitted. The new ones will overwrite the previous data check results.
Note: Resubmit data option is only currently available for Drivers Licences (all data providers), Passports (all data providers) and Australian Medicare cards (Dataconnect only). Navigate to the document you wish to resubmit on the Documents tab before clicking 'Resubmit data' option to select this document.
Redact Data
The Redact Data action feature enables users to redact PII data from a specific transaction while retaining the verification records and statistics. As a result of a successful redaction, the sensitive data will be hidden or greyed out, but the transaction record will still be available, as opposed to deleting a record. Both complete and incomplete transaction data can be redacted. This cannot be undone.
Warning! In progress transactions cannot be redacted. A workaround could be to cancel a transaction first and then redact it. To redact data from the portal, click on the Redact Data option from the Action drop-down list > click Redact to proceed.
The extracted data records, document-related assets, face match-related videos and selfies, and DVS provider results will all be redacted.
Documents
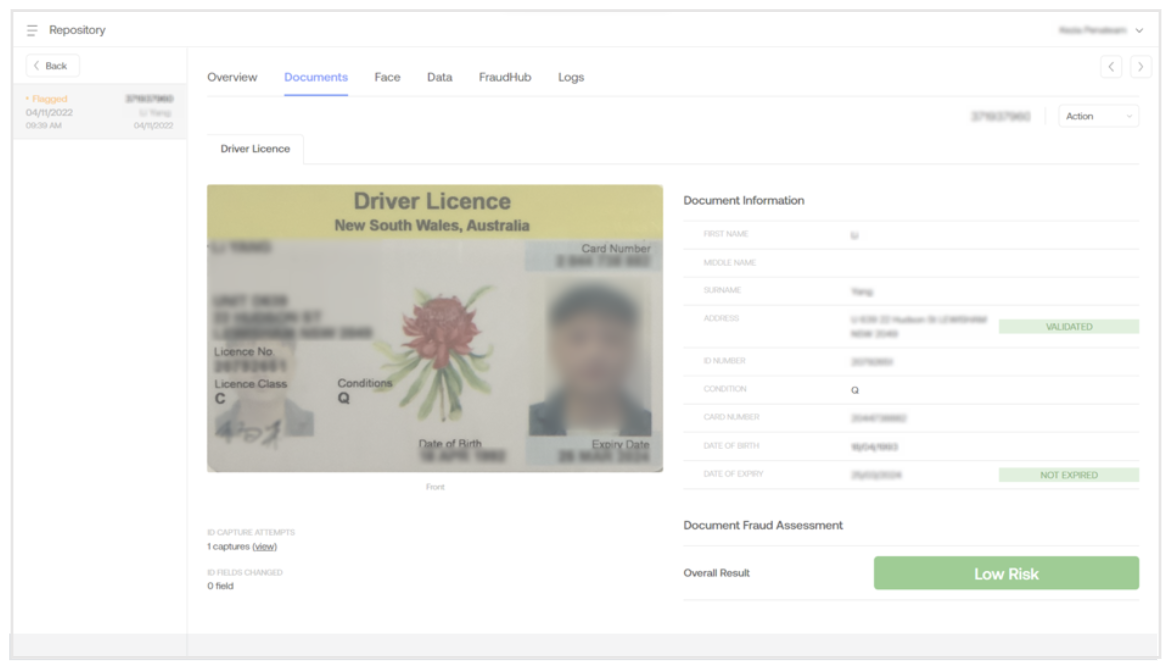
ID Scan uses proprietary and patented technology to verify that an ID document is genuine and has not been tampered with. The report's Documents tab displays the breakdown results of the document fraud assessment. Document-specific information is shown here, such as what was extracted from the document, what was confirmed, the number of edited fields, and whether the document is potentially fraudulent and why.
The documents tab of the records contains the following sections:
Document Information
This section contains the extracted information from the document. It includes the fields that are present and have been extracted from the ID document, as well as those that have been confirmed and validated.
The edited fields are shown with an indicator to show that they have been edited.
It will show what fields were edited in a simple-to-view UI if clicked. The EXTRACTED column shows the fields extracted directly from the document by the OCR engine. In contrast, the CHANGES column shows the changes made to the information by the individual, if any.
Document Images
The cropped and adjusted image of the ID document's front and back (if required) is shown here. Our unique camera control and image processing technology locates an identity document within an image or camera view, automatically captures and crops the card, and manipulates or corrects it before an OCR extraction is performed.
If multiple documents are captured, they will also be shown here.
Front of the Card
The record shows the cropped images, and users can see the original full images. This will aid in determining a fraudulent verification attempt.
Back of the Card
If required (or configured) the mobile flow prompts the individual to take a picture of the back of the card. The cropped captured image is present in this report section, and clicking it also displays the uncropped image.
Document Fraud Analysis (DFA)
This section will give a more detailed breakdown of the image elements that caused the flagged result. This can be caused by several factors, including the photo's quality or completeness. If any checks fail, it does not necessarily imply that the document is fraudulent; it simply did not pass the image test and requires your manual review. This gives the user some context for why an ID was flagged as High Risk.

The breakdown contains the following four checks:
| DFA Breakdown | Description |
|---|---|
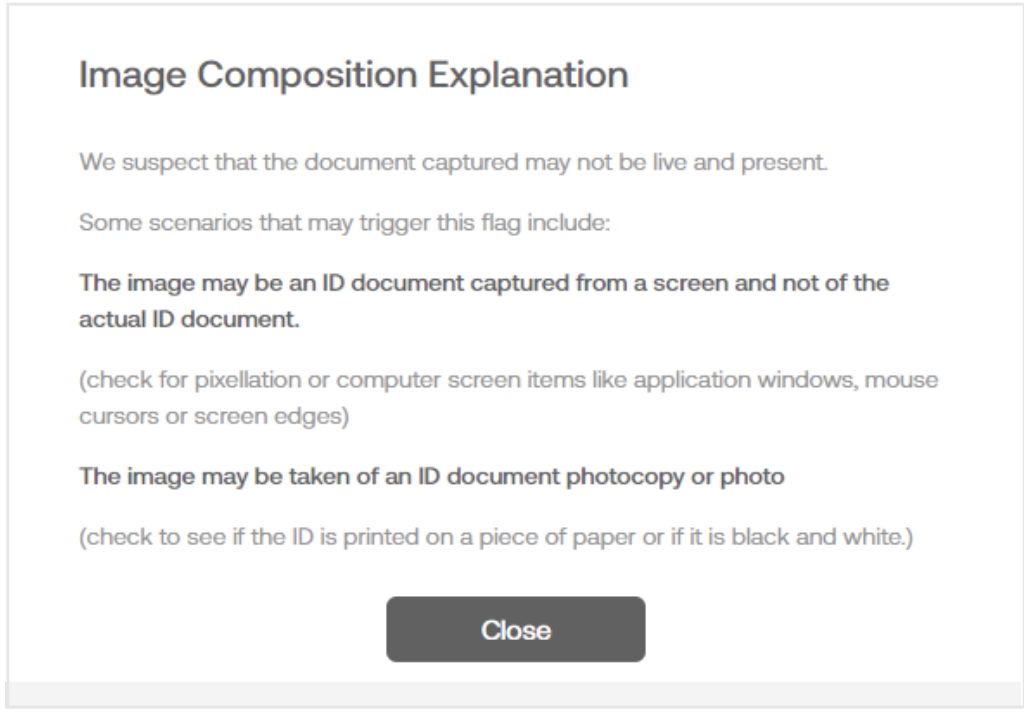
| Image Composition | Result of resolution, pixelation, image exposure, and camera WL analysis. They are flagged if the document is not live and present. i.e., the individual has captured the document from a screen or a photocopy. |
| Document Integrity | Result of document integrity and borderline critical analysis. It identifies fraudulent/synthetic IDs or genuine IDs that have been tampered with. Flagged if the document is damaged or not intact in addition to forensic image checks on the file itself, such as if the image was edited or not captured raw through a mobile camera. |
| Photo Check | Photo cover and portrait face analysis results. Flagged if the image of the individual’s face on the document is not as expected or is displaying suspiciously on the ID, for example, if the face has been overlaid or changed. |
| Detail Check | Result of text, alignment, symbol, and card detail analysis. Flagged if the document does not match specifications as printed by the authority. |
When you click on one of the assessment breakdown tiles, a pop-up window will appear with information on that specific check and what leads us to believe it is fraudulent. For example, clicking on a failed Image Composition tile will display the explanation window below.
ID Capture Attempts
This shows how many ID capture attempts an individual has made. By clicking view, you can also view the captured photos. It will include all captured attempts and documents (including multiple documents). Viewing failed ID capture attempts can also serve as an additional indicator of potential fraud.
Note: Individuals have three attempts to take an image of the expected document
ID Fields Changed
This displays the total number of ID fields that the individual has changed. If they modify more than the maximum number of fields allowed (3), an error message should appear in the mobile flow, and they will be asked to recapture their ID.
There are two kinds of edited fields:
Empty Fields
If there are some empty fields in the mobile flow because they were not OCR'd (scanned) and the individual fills those while confirming the information, the ID FIELDS CHANGED count will be affected.
A yellow warning icon will appear, displaying the edited field before and after the edit.
Non-empty Fields
Changes to non-empty fields will also affect the ID FIELDS CHANGED count.
Similarly, a yellow warning icon will appear, displaying the changes made in the CHANGES columns and the original entry in the EXTRACTED column.
Face
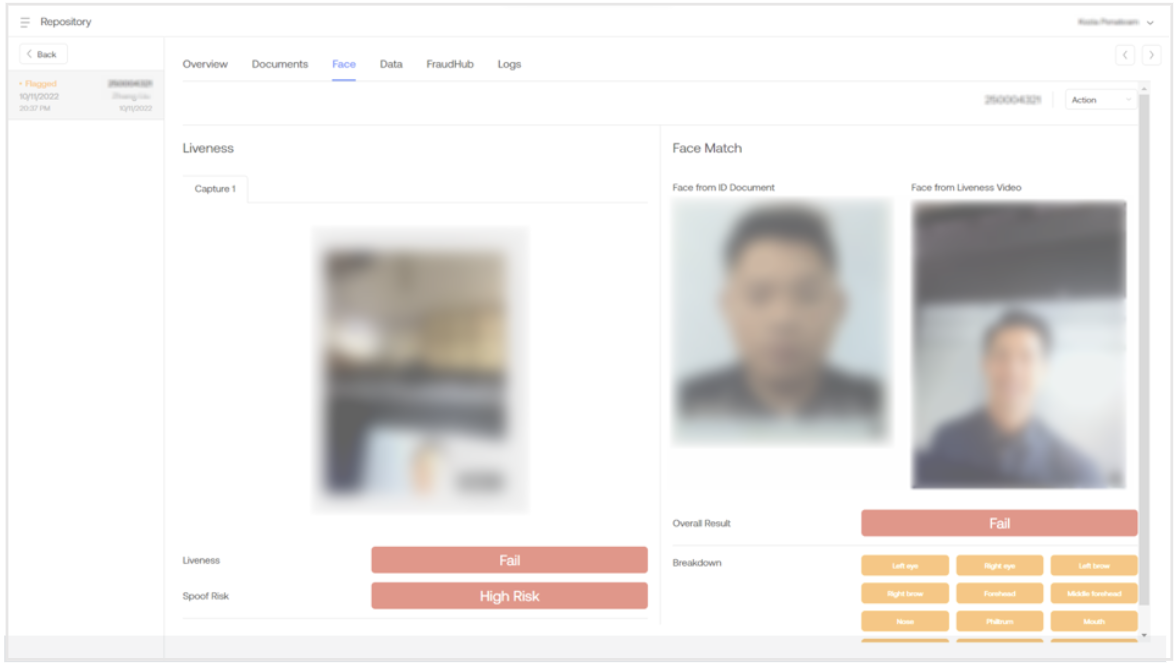
The user can access the transaction report's face match and liveness results by selecting the Face tab. Inside, the face match and liveness results are shown, including whether any suspicious presentation was detected within the video (spoof risk).
The Face tab contains the following sections:
Liveness Capture
The captured liveness attempts are displayed in the liveness video section, with an Enlarge button to view the full video. If multiple liveness attempts were made, they would also be present here. The PASS or FAIL value determines whether the individual is present and real.
Face Match
This section contains the ID document's face image under the Face from ID Document and an image from the liveness video under the Face from Liveness Video. The exact still from the liveness video used for the match result is displayed here instead of the whole video.
Overall Result & Breakdown
The Overall Result shows the face match comparison between the ID document and the liveness video. The comparison is based on hundreds of points on the face, which we summarise into a breakdown of 12 face areas, for each of which we provide a PASS (if green) or FAIL (if orange).
Spoof Risk
The Spoof Risk indicates the likelihood that the liveness attempt is a spoof. This check is an additional layer that detects masks, screens, and other fraudulent or suspicious presentation methods. It is categorised as either Low Risk or High Risk.
Warning! If there is insufficient video evidence to read, or if the video is corrupted or missing, it will also be flagged as High Risk.
We examine the liveness of video streams for fraud attack vectors using skin-level texture analysis, user interaction models, 3D face modelling and features, and heart rate analysis.
Logs
Within the transaction record, logs of transaction events are available inside the Logs tab with relevant details for auditing purposes. The event log, which contains all the information about who has seen what record and what has been done, can be viewed, and downloaded as a .csv file.
Event Log
A log of events can be seen in the transaction view, along with the date and time of each event and the user's details associated with that particular event. This is important to record and track events for security and surveillance purposes.
The following table lists a few potential events and their descriptions.
| Event | Description |
|---|---|
| Created | The date and time a transaction was created, the method (EMAIL, SMS, etc.), transaction ID, token, and the user who created the transaction. |
| Status Changes | The date and time when the status of a transaction changed, such as from Pending to In Progress to Completed-Pass. |
| Viewed | The date and time when the transaction is viewed and by which user. |
| Report Downloaded | The date and time at which the user downloaded a PDF report of a record. |
| Resent | The date and time at which the user resent a transaction link. |
| Notify | The date and time at which the user sends a transaction completion notification. |
| Flagged Transaction Override | The date and time at which a flagged transaction was overridden and by which user. |
| Redacted | The date and time a transaction was redacted and by which user. |
| Resubmit Data | It contains the user details and the date and time of the resubmission. |
Download Log
Users with the appropriate permissions can download the logs as a .csv file by performing the following steps:
Go to the Logs tab within the transaction record.
Click on the Download Log button.
The .csv file with the event logs will be downloaded and can be viewed, as shown in the image below.
The following headers are included in the .csv file:
| Header | Description |
|---|---|
| Triggered AtCreated | The date and time the event was triggered. |
| Event | The event that was triggered, for example, Viewed, Notify, etc. |
| Detail | A summary of the event containing the event name, details (email and name) of the user who triggered the transaction, and the time and date the event occurred. |
| User | The details of the user associated with the event. |
| IP | IP address of the individual carrying out the transaction. |
| User Agent | The OS and details of the device the transaction link was opened on. |
| Transaction ID | The unique identifier of the transaction. |
| Token | The unique token number of the transaction. |
| Reference | The reference name of the transaction |
| Flow Type | The mobile flow type of the transaction, for example, FLOW_V2, VOI_ V2, etc. |
| Method | The method used to send the transaction link, for example, SMS, EMAIL, etc. |
Data
Where permissions have been granted the Data tab will be shown. This is normally used for standard and enhanced DBS checks.
The data tab shows the results of fraud checks carried out with a third party data provider. It is broken down into the following three sections:
Verification Summary
This section contains the details of the transaction and of the user data that has been checked. It contains the following fields:
| Field | Description |
|---|---|
| ProviderTriggered At | The name of the third party fraud bureau used to perform the checks. OneID uses Synectics SIRA Realtime |
| Time and Date | Time and date of the transaction |
| Reference | A unique reference number for the transaction |
| Verified For | The company requesting the check. This will always be OneID |
| First Name | First name of the user, captured from the document and used in the check |
| Middle Names | Middle names of the user, captured from the document and used in the check |
| Surname | Surname of the user, captured from the document and used in the check |
| Date of Birth | Date of Birth of the user, captured from the document and used in the check |
| Address | Address of the user, captured from the document and used in the check |
Attributes
The attributes section shows the results of the specific fraud checks carried out against the user. It contains the following data:
| Field | Description |
|---|---|
| StrengthProviderTriggered At | Evidence of the identity collected from an authoritative source (e.g., a bank) |
| Validity | Evidence that the claimed identity is genuine based on the authoritative source |
| Activity History | Evidence of the identity being used positively (e.g., in an application for credit or insurance) |
| Identity Fraud | A count of the number of non-fraud records held. A zero match may indicate a synthetic identity |
| NSIRA – Fraud | National SIRA fraud match |
| NSIRA – Impersonation | National SIRA Impersonation match (has the identity been used maliciously by another person) |
| DDRI | Disclosure of Death Registration Information |
| Amberhill | Match to the police Amberhill database of known fraudulent identities |
KYC
The KYC Section can be used as 2+2 KYC evidence. It contains the following fields:
| Field | Description |
|---|---|
| PAD CountStrengthProviderTriggered At | Person address DOB match count |
| PA Count | Person address match count |
| PD Count | Person DOB match count |
| Distinct Count | Distinct count of number of data sources matched to |